반응형
업로드 시 히스토리 생성 > 체크박스 구현 > 버튼 제어 > 히스토리 영역
이번 시간에는 히스토리를 구현하도록 하겠습니다. 먼저 요구조건부터 살펴보겠습니다.
히스토리 요구조건
결재 상태에 따라 내용 추가(완)- 번호 : 각 게시글 마다 1번 부터 새로 발급 (1,2,3,4, ... )
각 요구조건을 알기 쉽게 풀어서 설명드리겠습니다.
결재 상태에 따라 내용 추가 : 상태 변화(A ▶ B)가 생길 때마다 히스토리 테이블에 추가해줍니다.
각 게시글 마다 1번 부터 새로 발급 : 히스토리의 실제 순서(PK 등)는 다르지만 특정 결재글의 히스토리는 순서대로 1,2,3,4,... 등의 번호가 메겨져 있어야 합니다.
각 게시글을 새로 번호를 부여해서 노출시켜보도록 하겠습니다.
1. Mapper
<select id="showHisList" resultMap="History">
    select
        row_number() over(order by eah.app_seq) rnum,
        eah.his_seq,
        case
            when eah.app_date is null then eaa.reg_date
            else eah.app_date
        end  app_date,
        eah.app_seq,
        case
            when eama.mem_name is null then eamw.mem_name
            else eama.mem_name
        end APPER_NAME,
        case
            when eama.mem_name is null then decode(eamw.mem_position,'aa','부장','bb','과장','cc','대리','dd','사원')
            else decode(eama.mem_position,'aa','부장','bb','과장','cc','대리','dd','사원')
        end APPER_PST,
        eah.app_date,
        decode(eah.app_status,'A','결재 대기','B','결재 중','C','결재 완료','W','임시 저장','X','반려') app_status
    from e_approv_history eah
    left join e_approval_member eamw on eah.writer_seq = eamw.mem_seq
    left join e_approval_member eama on eah.apper_seq = eama.mem_seq
    left join e_approval_app eaa on eah.app_seq = eaa.app_seq
    where eah.app_seq = #{appSeq}
    order by eah.his_seq
</select>
중간에 보면 Case문이 몇 개 보일 것입니다. 이렇게 쓴 이유는 히스토리의 구성 때문인데, 번호, 결재날짜, 결재자, 결재상태를 노출 시킬 것인데, 이 때 임시 저장, 결재 대기 같은 경우엔 결재자가 존재하지 않습니다. 그러므로 글쓴이와 글쓴 날짜를 노출시켜야 하기 때문에 위와 같이 쿼리를 작성했습니다.
2. Dao, Service
// History Dao Impl
    @Override
    public List<Map<String, Object>> showHisList(int appSeq){
        return sqlSession.selectList("HisMapper.showHisList", appSeq);
    }

// History Service Impl
@Service
public class HisServiceImpl implements HisService{

	@Autowired
	private HisDao hisDao;

	@Override
	public List<Map<String, Object>> showHisList(int appSeq){
		return hisDao.showHisList(appSeq);
	}

}
3. Controller
// App Controller

// 수정 전 코드
@RequestMapping(value = "/read/{seq}", method = RequestMethod.GET)
public String read(@PathVariable("seq") int seq, HttpServletRequest request, Model model,
        RedirectAttributes redirectAttributes) {
    HttpSession session = request.getSession();
    String sessionId = (String) session.getAttribute("sessionId");
    String sessionPst = (String) session.getAttribute("sessionPst");

    if (sessionId == null) {
        redirectAttributes.addFlashAttribute("msg", "로그인 하세요");
        return "redirect:/login";
    }

    Map<String, Object> appInfo = appSer.getAppInfo(seq);
    model.addAttribute("appInfo", appInfo);
    model.addAttribute("sessionPst", sessionPst);

    return "appPage";
}

// 수정 후 코드
@Autowired
private HisService hisSer;

@RequestMapping(value = "/read/{seq}", method = RequestMethod.GET)
public String read(@PathVariable("seq") int seq, HttpServletRequest request, Model model,
        RedirectAttributes redirectAttributes) {
    HttpSession session = request.getSession();
    String sessionId = (String) session.getAttribute("sessionId");
    String sessionPst = (String) session.getAttribute("sessionPst");

    if (sessionId == null) {
        redirectAttributes.addFlashAttribute("msg", "로그인 하세요");
        return "redirect:/login";
    }

    Map<String, Object> appInfo = appSer.getAppInfo(seq);
    model.addAttribute("appInfo", appInfo);
    model.addAttribute("sessionPst", sessionPst);

    List<Map<String, Object>> hisList = hisSer.showHisList(seq);
    model.addAttribute("hisList", hisList);

    return "appPage";
}
이제 히스토리를 조회한 것을 List<> 자료형에 담아서 View로 보내주는 코드를 추가해줍니다. (hisList)
4. appPage.jsp
<div class="approval-container">
    <div class="document">
        <h3>히스토리</h3>
    </div>
    <div class="approval-form">
        <table>
            <thead>
                <tr>
                    <th>번호</th>
                    <th>결재일</th>
                    <th>결재자</th>
                    <th>결재상태</th>
                </tr>
            </thead>
            <tbody>
                <c:forEach var="hisList" items="${hisList }">
                    <tr>
                        <td>${hisList.RNUM }</td>
                        <td><fmt:formatDate value="${hisList.appDate }" pattern="yyyy-MM-dd" /></td>
                        <td>${hisList.apperName } (${hisList.apperPst })</td>
                        <td>${hisList.appStatus }</td>
                    </tr>
                </c:forEach>
            </tbody>
        </table>
    </div>
</div>
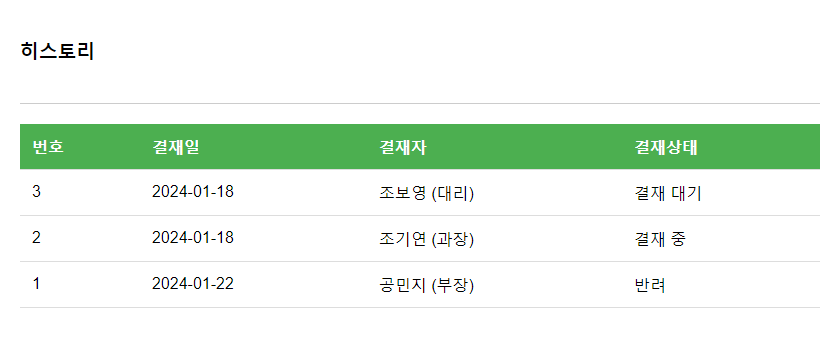
5. 결과물


위와 같은 결과가 나옴을 알 수 있습니다.
이제 모든 요구사항들을 모두 구현했습니다. 하지만 아직 남은 세부 사항들이 있죠. 다음 시간은 지금까지 세부적으로 구현했어야 할 기능들을 구현하는 시간을 갖도록 하겠습니다. 빠잇~!
후기
마지막 코드를 보면 fmt:formatDate 를 사용하는 모습이 보이실 겁니다. 사실은 저렇게 하려고 하지 않고 Mapper에서 연-월-일 형식으로 가공해서 출력해주려고 했는데, timestamp 형식이어야 한다는 에러 메세지가 떠서 저렇게 해줬습니다. 분명히 Dao, Service, Controller 모두 timestamp를 쓴 적이 없고 지금까지 연-월-일 형식으로 잘 사용해왔는데 어느 부분에서 저렇게 뜨는 것인지 알 수가 없네요.. 덕분에 새로운 방식으로 해결하는 경험을 했습니다!
반응형
'Spring > 전자 결재 Project' 카테고리의 다른 글
| [Spring] 전자결재 : 글쓰기 화면 2 (0) | 2024.01.18 |
|---|---|
| [Spring] 전자결재 : 글쓰기 화면 1 (1) | 2024.01.15 |
| [Spring] 전자결재 : 메인 리스트 화면 3 (1) | 2024.01.09 |
| [Spring] 전자결재 : 메인 리스트 화면 2 (2) | 2024.01.04 |
| [Spring] 전자결재 : 메인 리스트 화면 1 (1) | 2024.01.03 |