오늘은 결재글 리스트 화면을 구현하도록 하겠습니다.
만족해야 할 것
1. 대리 결재 버튼 (부장, 과장만 노출)
2. 게시글 조건
- 본인이 작성한 글만 보이도록 합니다.
- 과장은 결재대기 상태인 글만, 부장은 결재중 상태인 글만 보이도록 합니다.
- 결재 상태는 코드값으로 저장되지만 노출은 사용장게 맞춰서 보이도록 합니다.
- 작성자,결재자 이름을 저장하지 말고 결재 상태 처럼 노출만 작성자, 결재자 이름으로 되게 작성
1. 대리 결재 버튼
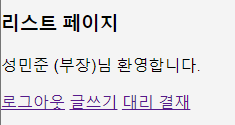
지난 시간에 로그인을 구현하면서 세션을 통해 로그인한 사람의 이름과 직급을 노출 시킨 적이 있습니다. 이 요구 조건은 그를 이용해서 구현하도록 하겠습니다.
[list.jsp]
	<h3>리스트 페이지</h3>
	<p>${sessionName } (${sessionPst })님 환영합니다.</p>
	<a href="${path }/logout">로그아웃</a>
	<a href="${path }/create">글쓰기</a>

<!-- 대리 결재 버튼 구현 -->
	<c:if test="${sessionPst eq '부장' or sessionPst eq '과장' }">
		<a href="#"> 대리 결재</a>
</c:if>[결과물]


2. 결재글 리스트
결재글 리스트를 구현하려고 보니 제가 그 동안 놓친 실수를 발견했습니다. 바로 결재날이죠! 세상에...!
어서 그에 대한 코드들을 구현해주도록 합니다.
[Oracle]
alter table e_approval_app add(app_date date);
[Mapper]
<!-- 이전 코드 -->
	<result column="APP_DATE" property="appDate"/>

<!-- ... -->

	<insert id="createApp">
		insert into e_approval_app(
		    app_seq,
		    app_title,
		    app_content,
		    reg_date,
		    app_status,
		    writer_seq
		    <if test="apperSeq != null">
		    , apper_seq
		    , app_date
		    </if>
		) values (
			#{appSeq},
			#{appTitle},
			#{appContent},
			sysdate,
			#{appStatus},
			#{writerSeq}
			<if test="apperSeq != null">
			, #{apperSeq}
			, sysdate
			</if>
		)
	</insert>
위와 같이 해주면 됩니다. 이제 본격적으로 리스트 화면을 구현해 봅니다.
전체글 보여주기
2-1. Mapper
<select id="getAppList" resultMap="App">
    select
        eaa.app_seq,
        eamw.mem_name WRITER_NAME,
        eaa.app_title,
        to_char(eaa.reg_date, 'yyyy-mm-dd') reg_date,
        to_char(eaa.app_date, 'yyyy-mm-dd') app_date,
        eama.mem_name APPER_NAME,
        decode(eaa.app_status,'A','결재 대기','B','결재 중','C','결재 완료') app_status
    from e_approval_app eaa
    left join e_approval_member eamw on eaa.writer_seq = eamw.mem_seq
    left join e_approval_member eama on eaa.apper_seq = eama.mem_seq
    order by eaa.app_seq desc
</select>
우선은 아무런 조건 없이 모든 리스트를 띄우는 것부터 하겠습니다. left join을 통해 apper_seq가 null일 때에도 불러올 수 있게 해줍니다.
2-2. Dao, Service
// Dao Impl
	@Override
	public List<Map<String, Object>> getAppList(){
		return sqlSession.selectList("AppMapper.getAppList");
	}

// Service Impl
	@Override
	public List<Map<String, Object>> getAppList(){
		return appDao.getAppList();
	}
2-3. Controller
	@RequestMapping(value = "/list", method = RequestMethod.GET)
	public String list(HttpServletRequest request, RedirectAttributes redirectAttributes, Model model) {
		HttpSession session = request.getSession();
		String sessionId = (String) session.getAttribute("sessionId");

		if (sessionId == null) {
			redirectAttributes.addFlashAttribute("msg", "로그인 하세요");
			return "redirect:/login";
		}

		List<Map<String, Object>> appList = appSer.getAppList();

		model.addAttribute("appList", appList);

		return "list";
	}
반환 받은 리스트를 appList로 View에 넘겨줍니다.
2-4. View (list.jsp)
<%@ page language="java" contentType="text/html; charset=UTF-8"
	pageEncoding="UTF-8"%>
<%@ taglib prefix="c" uri="http://java.sun.com/jsp/jstl/core"%>
<%@ taglib prefix="fmt" uri="http://java.sun.com/jsp/jstl/fmt"%>

<c:set var="path" value="${ pageContext.request.contextPath }" />
<!DOCTYPE html>
<html>
<head>
    <meta charset="UTF-8">
    <link rel="stylesheet" href="/resources/assets/css/style.css">
    <title>List Page</title>
</head>
<body>

    <div class="approval-container">
        <div class="document">
            <h3>리스트 페이지</h3>
            <p>${sessionName } (${sessionPst })님 환영합니다.</p>
            <a href="${path }/logout">로그아웃</a>
            <a href="${path }/create">글쓰기</a>
            <c:if test="${sessionPst eq '부장' or sessionPst eq '과장' }">
            	<a href="#"> 대리 결재</a>
            </c:if>
        </div>
        <div class="approval-form">
            <table>
                <thead>
                    <tr>
                        <th>번호</th>
                        <th>작성자</th>
                        <th>제목</th>
                        <th>작성일</th>
                        <th>결재일</th>
                        <th>결재자</th>
                        <th>결재상태</th>
                    </tr>
                </thead>
                <tbody>
                    <c:choose>
                        <c:when test="${not empty  appList}">
                            <c:forEach var="appList" items="${appList }">
                                <tr data-href="${path }/read/${appList.appSeq}">
                                    <td>${appList.appSeq }</td>
                                    <td>${appList.writerName }</td>
                                    <td>${appList.appTitle }</td>
                                    <td>${appList.regDate }</td>
                                    <td>${appList.appDate }</td>
                                    <td>${appList.apperName }</td>
                                    <td>${appList.appStatus }</td>
                                </tr>
                            </c:forEach>
                        </c:when>
                        <c:otherwise>
                        	<td colspan="7" style="text-align: center; vertical-align:middle;">조회된 데이터가 없습니다.</td>
                        </c:otherwise>
                    </c:choose>
                </tbody>
            </table>
        </div>
    </div>


</body>
</html>
본격적으로 리스트까지 출력해주니 CSS 코드에 맞게 코딩해 주도록 하겠습니다.
여기에서 주목할 것은 not empty appList입니다. 이를 통해 appList가 비어있는지 확인한 후 비어있지 않으면 정상적으로 데이터를 출력해주며, 비어있을 때엔 조회된 데이터가 없다는 문구를 띄워줍니다.
2-5. 결과물

본인 글만 보이도록 하기
2-6. Mapper
	<select id="getAppList" resultMap="App">
		select
			eaa.app_seq,
			eamw.mem_name WRITER_NAME,
			eaa.app_title,
			to_char(eaa.reg_date, 'yyyy-mm-dd') reg_date,
			to_char(eaa.app_date, 'yyyy-mm-dd') app_date,
			eama.mem_name APPER_NAME,
			decode(eaa.app_status,'A','결재 대기','B','결재 중','C','결재 완료') app_status
		from e_approval_app eaa
		left join e_approval_member eamw on eaa.writer_seq = eamw.mem_seq
		left join e_approval_member eama on eaa.apper_seq = eama.mem_seq
		where eamw.id = #{writerId}
		order by eaa.app_seq desc
	</select>
where 조건을 줬습니다. 저에겐 세션ID가 있으니 글쓴이 정보를 활용해서 조회해 주도록 하겠습니다.
2-7. Dao, Service
// Dao Impl
	@Override
	public List<Map<String, Object>> getAppList(Map<String, Object> param){
		return sqlSession.selectList("AppMapper.getAppList", param);
	}

// Service Impl
	@Override
	public List<Map<String, Object>> getAppList(Map<String, Object> param){
		return appDao.getAppList(param);
	}
파라미터를 추가해 주도록 합니다. 들어갈 것이 하나면 굳이 Map변수 까지는 필요가 없지만, 앞으로 다양한 조건들을 구현할 테니 미리 Map변수로 만들어 주도록 하겠습니다.
2-8. Controller
	@RequestMapping(value = "/list", method = RequestMethod.GET)
	public String list(HttpServletRequest request, RedirectAttributes redirectAttributes, Model model) {
		HttpSession session = request.getSession();
		String sessionId = (String) session.getAttribute("sessionId");

		if (sessionId == null) {
			redirectAttributes.addFlashAttribute("msg", "로그인 하세요");
			return "redirect:/login";
		}
        // 파라미터 정보 담기
		Map<String, Object> listCdt = new HashMap<String, Object>();
		listCdt.put("writerId", sessionId);

		List<Map<String, Object>> appList = appSer.getAppList(listCdt);

		model.addAttribute("appList", appList);

		return "list";
	}
Mapper에서 #{writerId}라고 해줬으니 sessionId를 writerId의 키값에 저장해서 파라미터로 넘겨주도록 합니다.
2-9. 결과물
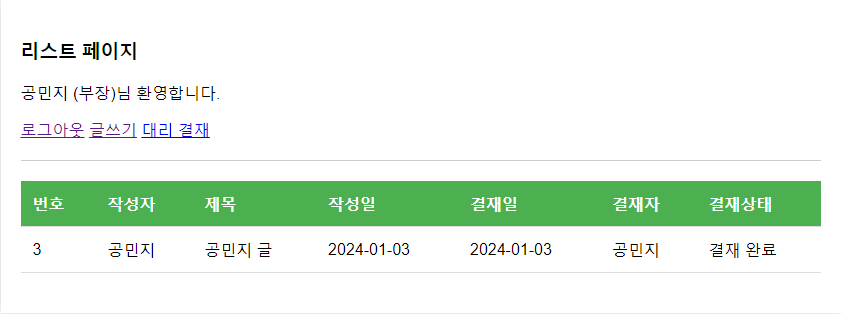
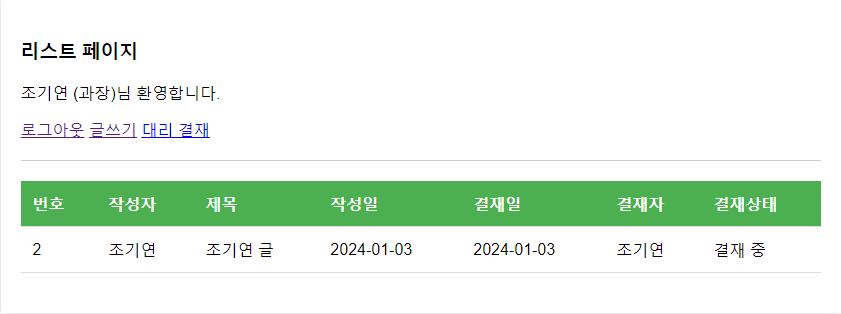


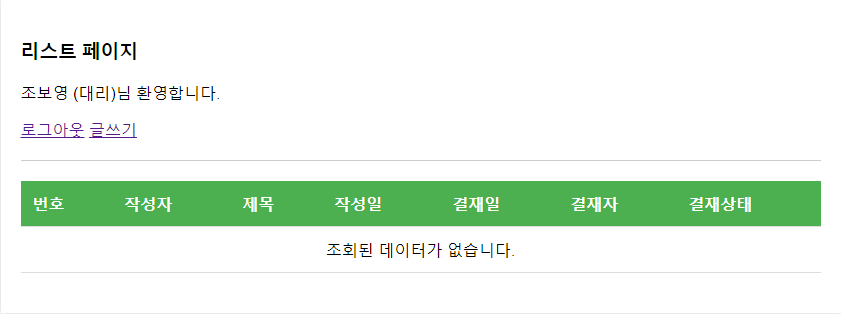
조건을 주기 전에 작성했던 각 아이디 별 하나의 글과 조건을 준 뒤 새로 작성한 결과 입니다.
예상대로 자신이 작성한 글만 보이도록 잘 작동하는 모습입니다!
다음에는 나머지 세 가지 조건도 구현하는 시간을 가지도록 하겠습니다. 감사합니다. 빠잇~!
후기
이번에 리스트를 구현하면서 큰 어려움 없이 잘 해결했습니다. 한 가지 어려움은 CSS 부분이었습니다. 테스트 중에 크롬에서 <table> 태그를 사용하다가 CSS 코딩이 적용되지 않아 당황했습니다. 그러나 브라우저를 변경하여 테스트하니 정상적으로 적용되는 것을 확인했습니다.
이번 시간을 통해 미리 구현한 기능과 새로운 요소를 대비하면 나중에 DB의 컬럼을 추가하거나 파라미터를 조정하는 등의 작업이 쉽고 최소한의 수정으로 가능하다는 것을 깨달았습니다. 결재날을 추가하거나 리스트 조건을 변경하는 작업도 모두 예상보다 쉽게 적용할 수 있었습니다.
이를 교훈 삼아 앞으로도 이와 같은 코딩 습관을 유지하고 발전시켜야겠다고 다짐했습니다.
'Spring > 전자 결재 Project' 카테고리의 다른 글
| [Spring] 전자결재 : 메인 리스트 화면 3 (1) | 2024.01.09 |
|---|---|
| [Spring] 전자결재 : 메인 리스트 화면 2 (2) | 2024.01.04 |
| [Spring] 전자결재 : 결재 글쓰기 (1) | 2024.01.02 |
| [Spring] 전자결재 : 로그인 (0) | 2023.12.28 |
| [Spring] 전자 결재 - 데이터베이스 설계 (1) | 2023.12.27 |